Friday, July 5, 2013

Humpy


Materials needed:
Hook:  Any 1x long dry fly hook sizes #8-14.  I am using an Allen 103BL size #14.
Thread:  Tan UNI-thread 8/0.
Tail:  Moose mane, or moose body hairs.
Body:  Floss (olive, orange, and yellow are popular), with deer hair folded over top.
Wing:  Deer hair tips from the folder over body.
Hackle:  Brown.

Place your hook in the vise and start your thread near the rear of the hook shank.


Tie in your tail, 1.5 times the hook gap, or just slightly shorter than your 1x long hook shank.


Secure the butt ends to the hook shank, and wrap the butt ends forward.

Return your thread to the rear of the hook.


Measure a clump of deer hair 2x the length of the tail, and tie it in.

Measuring the deer hair is the most important step for this fly!  Take your time, and start over if you made it too long.

Wrap over the flaring butts of deer hair to ensure it is secured to the hook.


Clip the butt ends as close to the hook shank as you can get without clipping your thread.


....and finish it off with some tight wraps.

It helps to keep the deer hair separated from the moose hair as much as possible.  Try to keep the deer hair on the top/sides of the hook shank only.


Tie in a piece of floss, and wrap your thread forward.


Wrap your floss forward.

Don't worry about tapering the body at all since we are covering the majority of it with deer hair.  


Fold the deer hair over the body, and secure it to the hook shank.

It's important that you keep the deer hair from rotating when you secure it to the hook shank.  You want to make sure you can see the floss from the bottom.


At this point you can create a small thread dam in front of the wings to stand them upright.

Separate the wings with some figure-8 wraps, and then post each individual wing as you would with normal hair wing dry flies.


Tie in your brown dry fly hackle, and wrap it forward.

I use the humpy in pocket water mostly, and I like to keep them bushy so I can see them better.  You can use as many wraps of hackle as you prefer.


Whip finish and trim your thread.


Tuesday, July 2, 2013

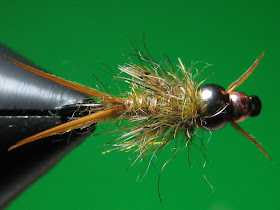
Depth charge birds nest


Materials needed:
Hook:  Standard 2x long hook shank nymph hook. Sizes #8-#16.
Thread:  Light olive 8/0 UNI-thread.
Weight:  One undersized copper tungsten bead, one oversized tungsten bead, 15 wraps of lead wire.
Antennae:  Tan goose biots.
Tail:  Tan goose biots.
Body:  AZ synthetics peacock golden dubbing.
Rib:  Copper wire.
Legs:  Partridge
Thorax:  AZ synthetics peacock golden dubbing with hares ear guard hairs mixed in.


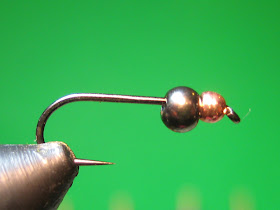
Place your beads on your hook.  

Put the copper bead on as you normally would, but put the black bead on the opposite way so the big hole in the black bead fits over the top of the copper bead.


Pull the black bead back to the hook bend, and start your thread just behind the copper bead.


Select 2 goose biots and place them back to back as shown.

For antennae, use goose biots from the bottom of the feather.  These are usually thinner, and aren't as rigid as the biots further up on the feather.


Tie in the biots on either side of the copper bead, and whip finish.


Put your black bead back up against the copper bead.

Wrap 15 or so wraps of lead behind the beads, and push the wraps into the bead.

Make sure you leave enough bare hook shank to tie in the tail!


Restart your thread just behind the lead wraps, and dub a little dubbing onto your thread.


Build a small bump with your dubbed thread.


Select two goose biots, and place them back to back.


Tie them in on either side of the bump of dubbing.


Trim the butt ends and tightly wrap your thread to the back of the lead wraps.


Wrap your thread across the lead wraps so you don't separate the lead wraps.


Do the same in the opposite direction.

When done properly, your lead wraps should be solid.  They should not rotate or move at all.


Tie in your copper wire rib.


Dub some dubbing onto your thread and wrap forward building a tapered body.


Wrap your rib forward, and tie it off.


Tie in some partridge legs on both sides.


Make a small dubbing loop with your thread.


Fill your loop with dubbing.  Mix in some guard hairs from a hares mask.


Twist.


..And wrap to build up a thorax.

The thorax should match the size of the black bead.  Make sure you push the black bead all the way forward and keep it in place with the dubbing.

Tie off the dubbing loop, and whip finish.

Use a dubbing brush to tease out fibers.


Sunday, June 30, 2013

Golden trout 6/22/2013 trip with GoPro footage!

So I headed back into the mountains last weekend with my GoPro to hopefully get a few shots of some golden trout.  I had OK luck this day, but my battery didn't last very long, and I wasn't able to use the GoPro for the rest of the trip.

There was a sedge fly hatch, and fish were pulling the adults off the top of the water like crazy.  Most fish I caught in the lake were on elk hair caddis , and small stimulators.  In the creek, they couldn't pass up a sierra bright dot, and would hit it even after I missed them the previous drift!  Sometimes traveling pretty far to eat it.

Well, enjoy the video, and let me know what you think!