Friday, October 12, 2012

How to tie the chartreuse cdc caddis pupa


Materials needed:
Hook: TMC 2487 sizes #20-14
Bead: Brass gold.  I'm using a 2mm (5/64) bead on a size 18 hook
Thread: UTC olive 8/0
Body: Chartreuse wire
Wing: One pale yellow plume of cdc

Put your bead on the hook.


Start your thread.


Tie in your wire body.


Wrap your thread over your wire to just above the middle of the hook gap.


Wrap your thread forward.


Start wrapping your wire tightly, and evenly toward the bead head.


Leave a little bit of room between your wire wraps and the bead head to tie in your cdc wing.  Tie off your wire, and break it off.


Select one cdc plume.


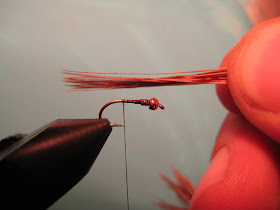
Tie in your cdc with 2 soft wraps...


...and pull to length.

Once you have a good looking length, tie off the cdc with 2 tight wraps, and cut off the tag end.

The cdc wing should extend just barely past the hook bend as shown.


Whip finish, and apply head cement.


How to make grasshopper legs.


These grasshopper legs look realistic, and they are easy to make!

Get some yellow or green dyed grizzly hackle.

I died these myself with some golden yellow Rit dye.


Select two feathers, that are similar in size.


Grab the tip of one hackle, and "preen" out the fibers so they are sticking straight out.


Roughly trim the hackle fibers thin near the tip and tapered larger near the base.

No need to get too close with your trim job at this point.  Just rough it up.  You will be able to touch it up after the next few steps.


Make a loop approximately in the middle of the feather....


..and put the tip of the feather through the loop, making a overhand knot.


Use your bodkin to control the knot, and put it right where you want it.

You can "roll" the knot up or down the stem with your bodkin by pulling on one end while your bodkin is in the loop of the knot.


Leaving you with this...


Do your finish trim.  Under the knot (joint), trim very close to the stem evenly up to the knot.  Above the knot, taper the barbs smaller near the knot, and larger near the base.


Here is a top view.


To attach these legs to a body, I strip the barbs from the stem where I'm going to tie it in, and flatten the barb with a pair of pliers to keep it from rotating when you tie it in.


Tuesday, October 9, 2012

How to make realistic eyes for scuds, crayfish, etc.


These eyes look great, and they're really easy to make...

Cut about a 2 inch piece of mono.

You can use any size mono you want.  In this example, I am using 10 pound test.

Hold the mono with some pliers or forceps.


With a lighter, burn one end.  It doesn't take much to catch the mono on fire, but try not to.  Heat it slowly, while rotating the pliers to keep a nice, even bead.


Do the same thing on the other side.  Try not to let the hot mono touch the pliers, otherwise the bead will be flat on one side when it cools.


I make about 20 or so of these at a time, different sizes, and colors..

To make lighter, amber colored eyes, let the mono burn quickly.  Just be make sure you blow out the flame before it hits the pliers.

To make different sizes, you can use a heavier line, or you can just use a bigger segment of mono.


You can tie the eyes in with a few figure eight wraps to hold them in place.


Play around with these techniques for a bit, and you will be a pro in no time!


Monday, October 8, 2012

The perfect suspending strike indicator solution!

The no-slip, no-kink, easily adjustable strike indicator (suspender).


There is no shortage of strike indicators on the market these days.  I have tried them all, and while they all work, most come with pretty nasty side effects.

For example, the thingamabobbers shown in the picture on the right, kink, and damage your line.  It is also a pain adjusting your depth with these types of indicators.

The yarn type indicators sink, especially with heavier flies, and they kink the link too.

The foam indicators that come with toothpick's don't kink your line, and are easy to adjust, but you can't put them on, or take them off without removing your flies.  They also slip after heavy use, because the toothpick bores out the hole in the foam.

Here is a great solution that I have found.  

Buy some of those foam ball, or teardrop type indicators that include little toothpicks with them.

Buy a bag of rubber bands like the ones shown in the picture above.  The thin wide ones might not work properly.

Make a loop with your tippet, and feed it through the hole in the indicator...

..as shown.


Cut your rubber band, and feed it through your tippet loop.

This is all feel.  Larger size indicators require more rubber band in the hole to hold it in place.  I often double up the rubber band to hold it in place.


Pull your tippet back through the hole in the indicator, pulling the rubber band along with it.


Cut the tag end's off the rubber band, but be sure to leave enough rubber band to pull in case you need to tighten your indicator to your line.

To adjust your depth, simply hold the indicator while you slip your line up or down.

If your indicator slips too easily, double up the rubber band in the hole of the indicator.

When wet, the line "locks" to the rubber band.


This is the best strike indicator solution that I have found for my needs.  

I hope you all find this useful! 

Sunday, October 7, 2012

How to tie the Flashback Beadhead Pheasant Tail Nymph

Flashback Beadhead Pheasant Tail Nymph


This is another killer pattern that I have had great luck with.  I use it when fish are eating darker mayfly nymphs in rivers, or during a callibaetis hatch.  I have also read about fish taking this pattern as a midge.  This is a go to pattern for me, and there is no better combination to search for fish than a Gold Ribbed Hare's Ear, and some variation of a Pheasant Tail Nymph dead drifted through a deep bend.

Materials needed:
Hook:  Standard nymph hook #12-22.
Thread:  Dark brown UTC 8/0.
Bead:  Tungsten, or brass, copper color, one size smaller than you would normally use.
Weight:  Several wraps of lead wire behind the bead.
Tail:  Pheasant tail fibers.
Rib:  Small copper wire (wrapped counter-clockwise).
Body:  Several pheasant tail fibers wrapped (wrapped clockwise).
Flashback:  Large pearl tinsel.
Thorax:  Peacock herl.
Legs:  Pheasant tail fibers.

Place your copper colored bead on your hook.  Use one size smaller than you would normally use for your size hook.  For example, I am using a 2mm (5/64) bead for my size 14 hook.

I use a smaller bead to leave enough room for a thorax behind the bead.  I think it looks better to have the bead match up perfectly to the thorax as well.


Wrap your lead wire, 10 or so wraps, and push the wraps into the big hole of the bead head.  Just like with all weight, this step is optional.


Tightly wrap thread over your lead wire wraps.  

If you wrap your thread normally over the lead wire, it will separate the wraps, and leave you with a mess.  To remedy this, I always wrap my thread across the lead wraps a few times to keep them together, then you will be able to tightly wrap your thread normally to cover all the lead.

Make sure your lead wraps are tightly secured to your hook shank.


Straighten the tips of some pheasant tail fibers.  Measure your tail.  The length of the tail should be the length of the hook shank.


Tie in your measured tail with a soft wrap, followed by a few tight wraps.


Cut off the tag end of your pheasant tail fibers, and tie in your copper wire rib on a 45 degree angle (as shown) with a soft wrap, followed by a few tight wraps to bring the wire tightly to the top of the hook shank.


Cut three or four pheasant tail fibers from your pheasant tail feather, close to the stem of the feather.  Cut off about a half inch from the tips of the fibers, because the tips are brittle, and they break easy when you wrap your body.


Tie in your tail fibers on a 45 degree angle with a soft turn, then a few tight wraps should bring the fibers tightly to the top of the hook shank.


Tie in your fibers all the way back to the tail.  Give yourself one wrap of thread behind the wire rib.


Wrap your thread forward, building a slight taper as you go.


Wrap the tail fibers forward clockwise around the hook shank.

For the body, I use a technique called counter wrapping.  Counter wrapping is wrapping one body material one way, and the rib material the other way.  It is used to strengthen fragile body materials, like quill bodies, and fiber bodies.  Wrap your pheasant tail fibers either clockwise, or counter-clockwise, just make sure you wrap your rib the opposite way. 


Wrap your rib counter-clockwise around the hook shank.  Tightly tie in your rib wire, and break the wire by bending it back and forth near the tie in point.


This is the view from the top.


Tie in some pearl tinsel for a flashback.


Select a few strands of peacock herl, cut the tips off.  About an inch.

Again, you cut the tips of the peacock herl off because it's weak, and it will probably break when you're wrapping your thorax.


Tie off your peacock herl, and cut off the tag end.


Tie in six or so pheasant tail fibers on one side of the thorax with two soft wraps.


You can tie the tail fibers in long, with 2 soft wraps.


Pull the pheasant tail fibers to length, about the length of the hook shank.

Keep the fibers on the side of the thorax.  Use your other hand to keep the fibers from shifting.  You may have to re-tighten your thread wraps.


Once the fibers are pulled to length, cut the tag ends, and tie them off with a few tight wraps.


Tie in 6 legs on the other side of the thorax using the same technique.


Fold the pearl tinsel flashback over the thorax, and tie it off with a few tight wraps of thread.


Whip finish, and apply head cement.

I ended up plucking out some of those fibers making up the tail of the nymph.  It looked a little thick to me.